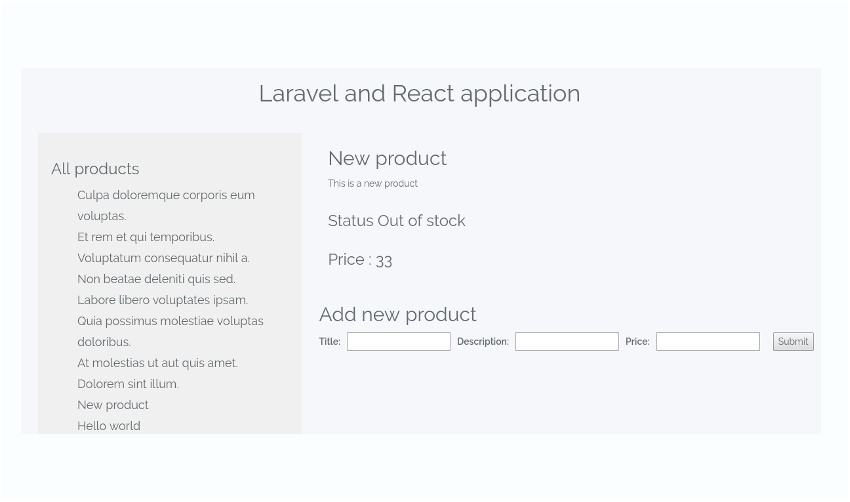

This is the second and final part of the series on building a React application with a Laravel back end. In the first part of the series, we created a RESTful API using Laravel for a basic product-listing application. In this tutorial, we will be developing the front end using React.
We will also consider all the available options to bridge the gap between Laravel and React. You don’t need to have followed part one of the series to understand this tutorial. If you’re here to see how React and Laravel fare together, you can, in fact, avoid the first part. You should head over to GitHub, clone the repo, and take the quick recap down below to get started.
A Quick Recap
In the previous tutorial, we developed a Laravel application that responds to API calls. We created routes, a controller, and a model for the simple product listing application. Since it was the controller’s job to return a response to the HTTP requests, the view section was entirely skipped.
Then we discussed techniques for exception handling and validation using Laravel. By the end of the tutorial, we had a Laravel back-end API. We can now use this API to build applications for both the web and a wide range of mobile devices.
In this tutorial, we will be shifting our focus towards the front end. The first half of the tutorial is about setting up React in a Laravel environment. I will also introduce you to Laravel Mix (supported by Laravel 5.4 and later), which is an API for compiling assets. In the second half of the tutorial, we will start building a React application from scratch.
Setting Up React in Laravel
Laravel Mix was introduced in Laravel 5.4, and it is currently the ideal way to hook up React and Laravel. With Laravel 5.5, the whole process was made much easier. I’ve described both methods below.
Using the React Preset Command (Laravel 5.5)
Laravel 5.5 has a brand new feature that lets you scaffold the code for React components using artisan’s preset react command. In previous versions of Laravel, setting up React inside Laravel wasn’t this easy. If you’re running the latest version of Laravel, then run the below command to add a React preset to your project.
php artisan preset react
Laravel by default gets shipped with the Vue preset, and the above command replaces all instances of Vue with React. Interestingly, if you don’t need a preset, you can remove them altogether using the php artisan preset none command.
If everything goes well, this should show up in your terminal.
React scaffolding installed successfully.
Please run "npm install && npm run dev" to compile your fresh scaffolding.
In the background, Laravel uses Laravel Mix, which is a smooth wrapper for webpack. Webpack, as you might already know, is a module bundler. It resolves all the module dependencies and generates the necessary static assets for JavaScript and CSS. React requires a module bundler to work, and webpack perfectly fits into that role. So Laravel Mix is the layer that sits on top of webpack and makes it easier to use webpack in Laravel.
A better understanding of how Laravel Mix works is important if you need to customize the webpack configuration at a later time. The React preset command gives us no information about how things work in the background. So let’s remove the React preset and retrace the steps manually instead.
Manual Method (Laravel 5.4)
If you’re running Laravel 5.4, or if you are just curious to see how Laravel Mix is configured, here are the steps that you need to follow:
Install react, react-dom and babel-preset-react using npm. It might be a good idea to have yarn installed too. It’s no secret that Laravel and React prefer yarn over npm.
Head over to webpack.mix.js, located inside the root directory of your Laravel project. This is the configuration file where you declare how your assets should be compiled. Replace the line mix.js('resources/assets/js/app.js', 'public/js'); with mix.react('resources/assets/js/app.js', 'public/js');. app.js is the entry point for our JavaScript files, and the compiled files will be located inside public/js. Run npm install in the terminal to install all the dependencies.
Next, go to resources/assets/js. There’s already a components folder and a couple of other JavaScript files. React components will go into the components directory. Remove the existing Example.vue file and create a new file for a sample React component.
resources/assets/js/component/Main.js
import React, { Component } from 'react';
import ReactDOM from 'react-dom';

/* An example React component */
class Main extends Component {
    render() {
        return (

                All Products

        );
    }
}

export default Main;

/* The if statement is required so as to Render the component on pages that have a div with an ID of "root";
*/

if (document.getElementById('root')) {
    ReactDOM.render(, document.getElementById('root'));
}
Update app.js to remove all the Vue-related code and import the React component instead.
resources/assets/js/app.js
require('./bootstrap');

/* Import the Main component */
import Main from './components/Main';
Now, we just need to make the assets accessible to the View. The view files are located inside the resources/views directory. Let’s add a

