ReactCrashCourseforBeginners,Part

React Crash Course for Beginners, Part 4

In this final tutorial in our React series, we’ll create a new  component for adding new movies manually via a custom form. This will bring development for the ‘Movie Mojo’ app to a close.

The code for the final project is available to download via the link to the right of the screen (you might need to scroll down). Later on I’ll provide step-by-step instructions on how to get the project up and running on your system.

Create the AddMovie Component

The  component outputs a form to allow users to manually enter details about an individual film and add it to the existing movies in the gallery once the form has been submitted.

The form requires three text inputs for title, year, and poster image; plus a text area for the movie description. In /src/components/, create a new file called AddMovie.js and add the following:

The React ref attribute stores a reference to each form input field as a component class property. We’ll use these references shortly as a way to easily grab input field values.

Firstly, though, add the following styles to App.css to make the form a little more aesthetic:

In App.js, add the  component inside the closing

 wrapper element:

Then, at the top of the file, import the  component to make it available.

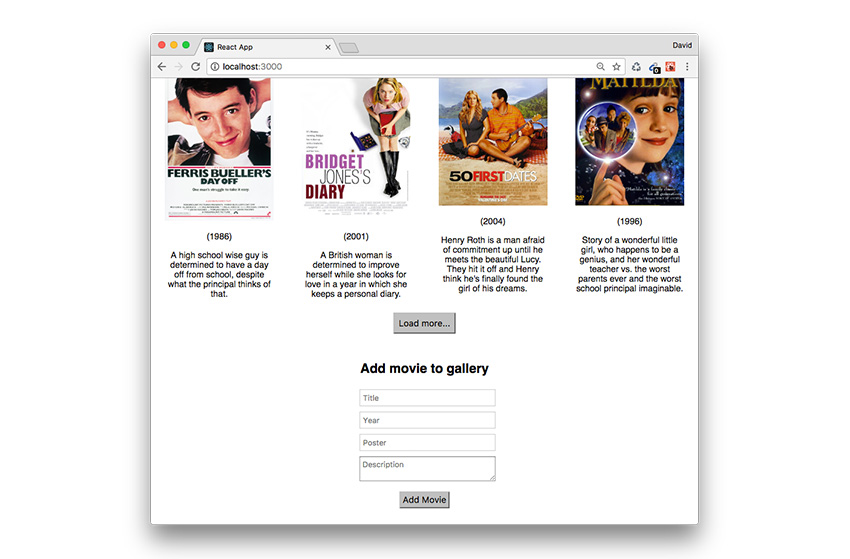
Your ‘Movie Mojo’ app should now display a form towards the bottom of the browser window.

Displaying Movie Mojo at the bottom of the browser window

We need to specify a callback method that executes whenever the form is submitted, which we can use to create a new movie. Add this to the

 element:

Then, add the addNewMovie() method to the top of the  component class:

The first task is to prevent the default submission event from firing, which we do with e.preventDefault(). Otherwise, when the form is submitted, the web page will automatically refresh, which is not what we want.

Then, we create a new movie object by grabbing the form input field values we conveniently stored as component class properties earlier.

A console.log() command outputs the movie object so we can test it’s being created correctly upon form submission.

Viewing the output of consolelog

Once you’re satisfied the movie object is being correctly generated, go ahead and delete the console.log() call.

In order to display the new movie in our gallery, we need to add it to the movie state object. Once this is done, React will take care of updating the DOM for us.

To accomplish this, create a new method in App.js (where the app state object lives) to handle adding a movie to the current state.

Don’t forget to bind the new method to the this so it’s available throughout the class.

Incidentally, you may wonder why we needed to do this here but not for the addNewMovie() method we added to the  component above. This is a side effect of using an ES6 arrow function, as it automatically binds this for you. This little trick is well worth remembering as it reduces the code complexity, whilst improving your code’s readability.

To use addMovieToGallery() in our  child component code, we simply pass down a reference to it via props. In App.js, update the  call to be:

Back in AddMovie.js, update the addNewMovie() method to pass the movie object to the addMovieToGallery() method via the addMovie prop we just created.

Now, when we fill out the form, we get the movie object outputted to the console, as before, but this time it’s via the addMovieToGallery() method in the  component.

Reviewing the console for addMovieToGallery

Delete the console.log() command in addMovieToGallery() and replace it with the following code to add the entered movie details to the movies state object:

This is pretty similar to what we did in part three for the loadAdditionalMovies() method. The main difference is that a unique key needs to be generated, on the fly, for each additional movie entry. This is achieved by using the current time stamp as the unique key and appending it to movie.

This will result in each additional movie, added via the form, having unique keys.

… and so on.

Open up the ‘Movie Mojo’ app in the browser and add two new movies to the gallery via the form. There are extra movie poster images added to the ./public/posters/ folder for convenience, so you can easily test adding movies to the gallery. You can access these by downloading the finished app project.

Each time you submit the form, an additional movie is added to the gallery!

Submitting a movie
Submitting another movie

Installing Movie Mojo

Click the link to the right (about halfway down the page) to download the finished ‘Movie Mojo’ project zip file. Once it’s extracted, open a command-line window and navigate to the movie-mojo directory, and enter:

This will take a few minutes to download all the ‘Node.js’ modules needed to run the project.

Then type:

This will compile the React app and open it in a browser via a dedicated mini web server.

Conclusion

We’ve covered quite a lot in this four-part tutorial series, so congratulations if you’ve made it all the way through and followed along with the code.

You should now feel comfortable with the basics of React, and this will hopefully give you the confidence to go on and build more complicated apps.

I’d recommend downloading the ‘Movie Mojo’ project and examining the source code to make sure you understand how it all fits together.

There’s lots of scope to extend the app, so why not try to come up with some new extra features? This is also a great way of cementing your learning, by attempting to implement new React elements to the app.

Here are some ideas you could consider adding:

  • Add UI and code to remove movies from the gallery.
  • Allow sorting by movie title, year, etc.
  • Introduce a ratings system.

I’d love to hear any feedback you might have about this tutorial via the comments below. Did you find it easy to follow, or were there parts you struggled with? I’m always looking to make my tutorials better, so feedback is always very welcome.

Happy React coding!

Powered by WPeMatico

Leave a Comment

Scroll to Top